GitHub Copilot Notes.
Table of Contents
GitHub Copilot and its customization instructions, a powerful framework for struct-ing and reusing prompts to get consistent, high-quality AI assistance across a codebase.
Overall idea
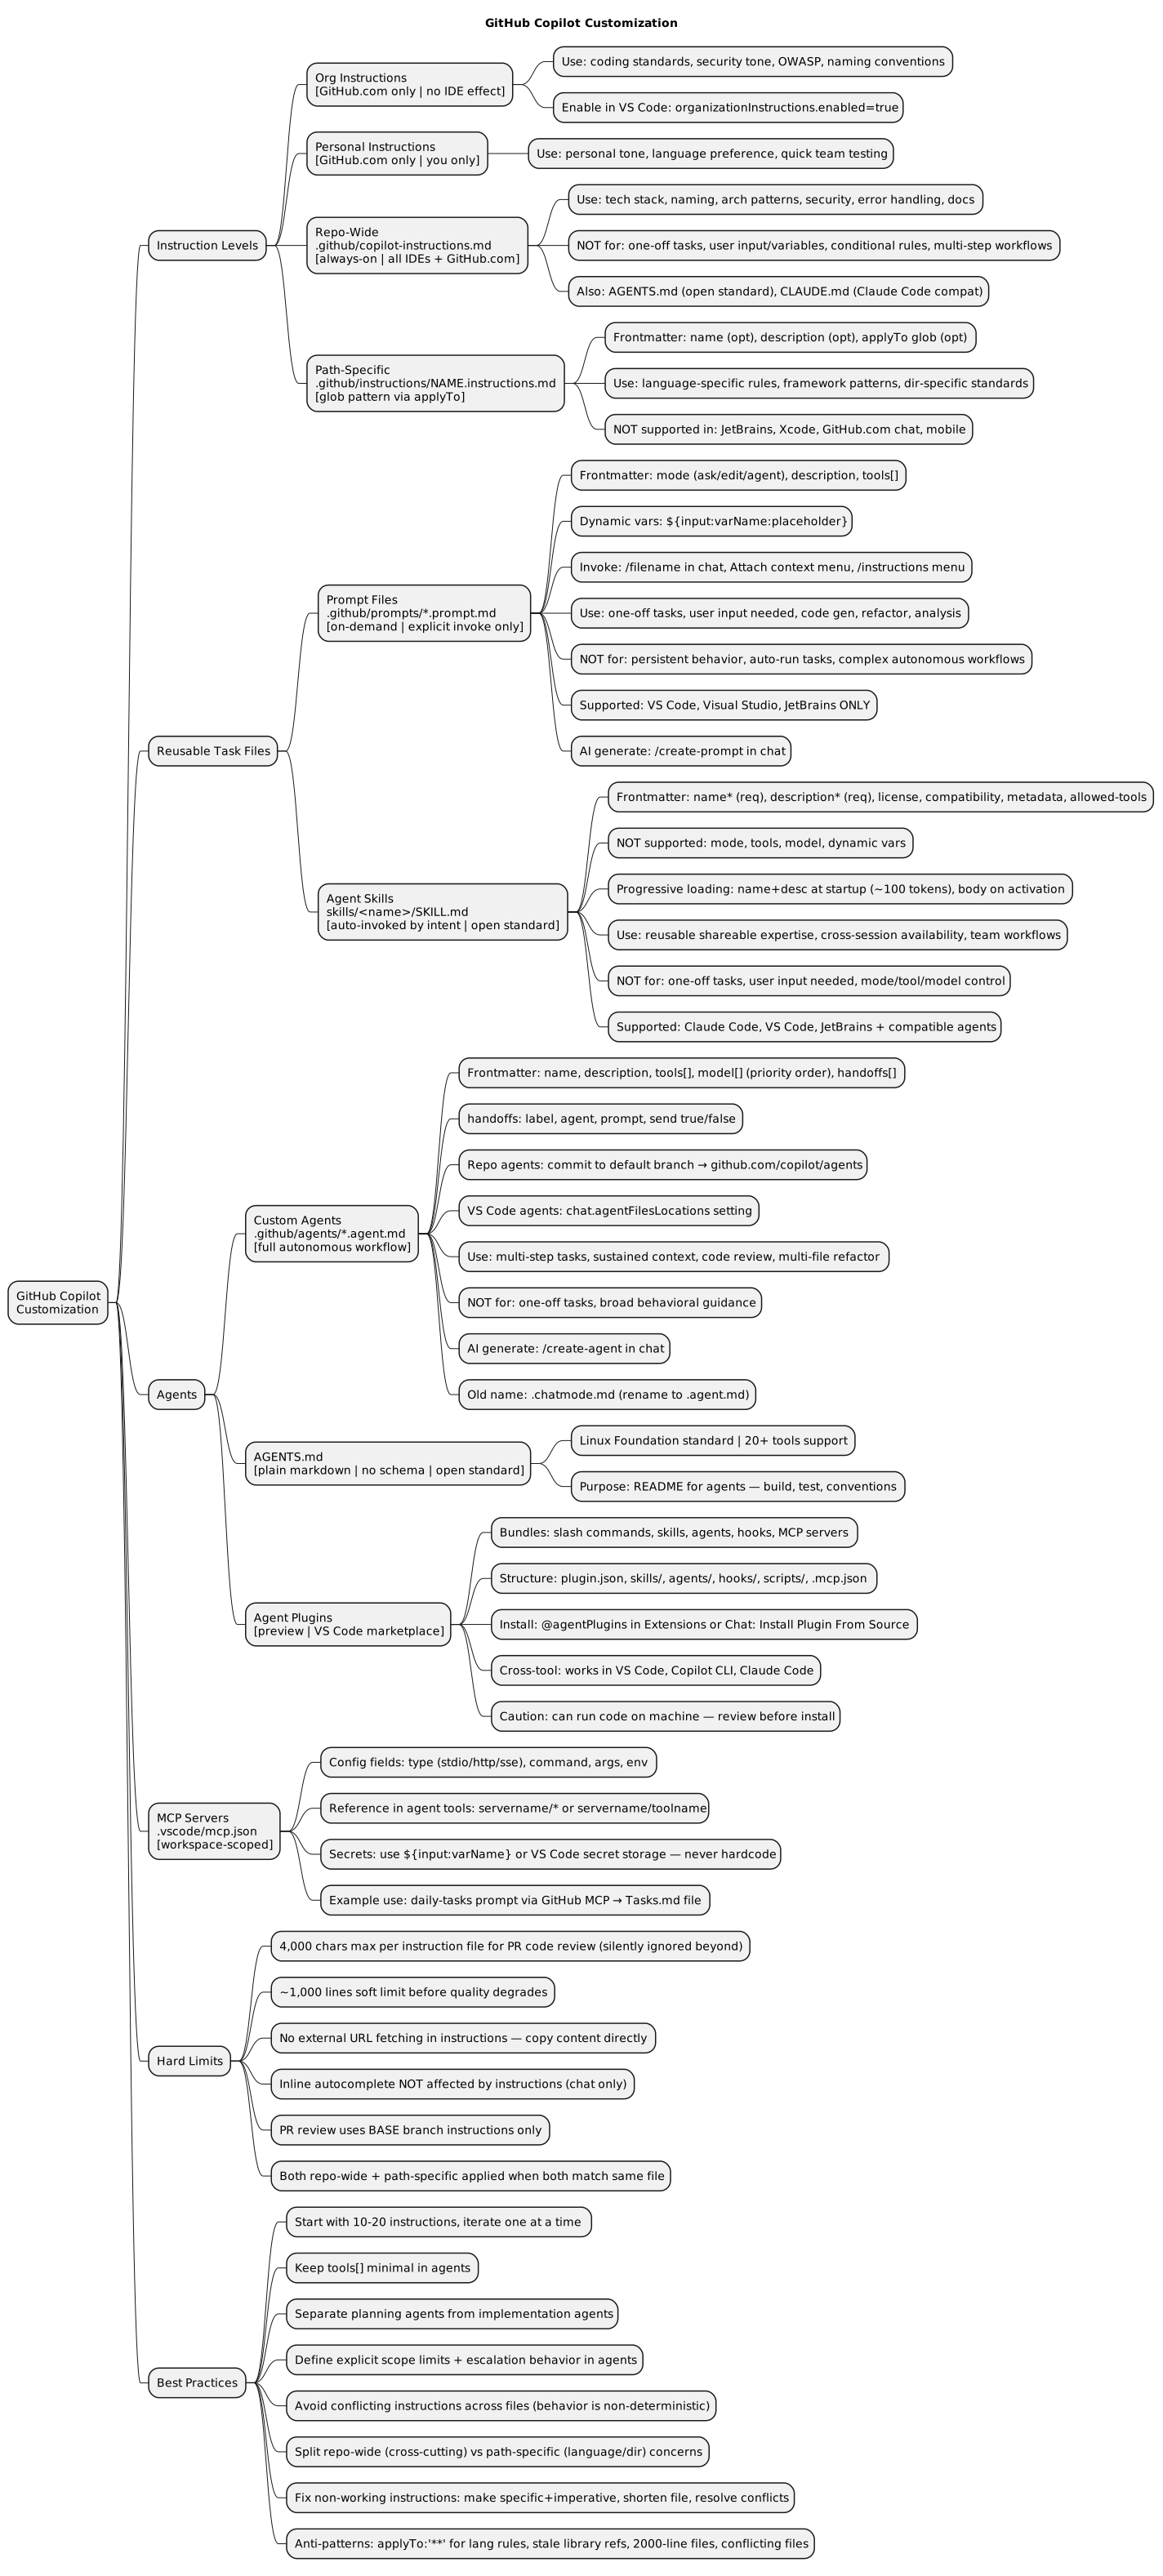
Introduction
- Today we are going to go thru a practical guide to using GitHub Copilot with structured customization.
- custom instructions, prompt files, skills, agents and hooks work together to make AI assisted ecosystem.
Todos
- skill to find out the context left over
- controlling Skills
- the permissions
- the Human in loop (where in workflow and what)
- is it possible to persist the context across runs?
- context window how to control
- extensions
- Website: ChatGPT
- extension:
- Copilot
- opencode (VS Code extension / IDE extension)
- what are kilo code and roo code?
- claude code (in terminal/cli)
- dedicated ides (no extension etc needed)
- cursor
- antigravity
- Codex
- AI Code is written in cloud and send a request to repository
- browser based (no ide)
- lovable
- bolt.new
- copilot modes:
- local
- copilot cli
- cloud
- handoffs
- simple browswer
- liveserver
- checkpointing
How to choose a model
Reference
Model Selection.
Factors to consider
Speed v/s Quality/Task Complexity v/s Cost:
🟢 Fast/smaller models — Claude Haiku 4.5, GPT-4.1/5.4 mini, Gemini 3 Flash, Auto mode
- situations: Day-to-day coding, quick explanations, routine suggestions
- general code completition, renaming Variables, boilerplate, simple autocomplete
🟡 Balanced — Claude Sonnet 4.6, GPT-5.4, Gemini 3.1 Pro
- situations: Adding a new feature based on KnowledgeBases, fixing a reasonably hard bug
- Moderate refactors, writing tests for existing code from A/Cs.
🔴 Quality — GPT-5.4/5.5, Claude Opus 4.6/4.7, Gemini 3.1 Pro
- situations: higher accuracy, complex reasoning, debugging or multi-step tasks
- Larger model incur highes cost
- very Complex refactoring (e.g. multi-layered auth system)
- High-stakes logic (e.g. Debugging a complex Charge/Payment Processing module)
- Multi-step debugging with cross-file reasoning
- 3am bug fixing.
- Don’t use cheaper models here — false economy, more retries = more tokens spent
💡 Quota Tip: set your editor’s default/auto model to a 🟢 smaller model, and only switch up manually when the task genuinely demands it.
Specialization:
- Some models are better at some specific tasks than others.
- Examples:
📝 General Purpose & Coding — Claude Sonnet 4.6, GPT-5.4 mini
- Code mixed with technical writing or documentation
- Architecture planning, code reviews, README generation
🤖 Agentic usecases — GPT-5.4-Codex, Grok Code Fast 1
- automated PR creation, Large-scale refactors
🖼️ Text & Image — Claude Sonnet 4.6, GPT-5.4/5.5, Gemini 3.1 Pro, Grok 4
- Screenshot → reproduce or debug as code
- Diagram → generate tickets or architecture docs
📄 Text & PDF / Docs / Slides — Gemini 3.1 Pro — Gemini 3.1 Pro (superior model for most usecases 2x better for reasoning) is same price as Gemini 3 Pro (2M token context)
- invoice documents, Scanned documents, ppt slides, multi-page PDFs,
- Extract structured data from charts or forms
🎥 Text & Video — Gemini 3.1 Pro
- Summarize a recorded standup or demo
- Analyze a video walkthrough and generate action items
🎨 Image & Video Generation — Grok Imagine, GPT-5.4 (with DALL·E)
- Product teasers, demo clips, UI mockup visuals
🧩 Mixed Multimodal (text + image + video + code) — Gemini 3.1 Pro
- Complex tasks spanning multiple input types simultaneously
Usecase:
- Some environments prohibit or cannot use AI-generated code entirely:
- Air-gapped or classified environments block access to cloud-based AI APIs when it involves certification standards like DO-178C / MIL-STD which demands formal verifiable code.
- Some environments prohibit or cannot use AI-generated code entirely:
https://docs.github.com/en/copilot/reference/ai-models/model-comparison
Benchmarks and Comparisons
- SWE-bench: Evaluates models on software engineering tasks. Higher scores indicate better coding capabilities.
- LiveBench: General AI benchmarks for reasoning, math, coding, etc.
- Official Comparison: Refer to GitHub’s AI Models Comparison for detailed metrics on available models.
AI Benchmark Types
| Benchmark | Type | What it checks | When it matters |
|---|---|---|---|
| SWE-bench Verified Leadersboard (SWE = Software Engineering; benchmark) | Coding | 1. Can the model fix real GitHub bugs? 2. Patches are applied and actual test suites run — pass/fail, no subjectivity. | Choosing a model for software engineering agents, autonomous bug fixing, or code generation at scale. |
| Terminal-Bench (Terminal Environment Benchmark) | Agentic | Can the model operate in a real terminal — running shell commands, navigating file systems, executing scripts — to complete tasks end-to-end? | DevOps automation, CLI agents, any task where the model needs to operate a computer rather than just write code. |
| τ²-bench Retail / Telecom (Tau-squared Bench) | Agentic | 1. Can the model act as a customer service agent while a simulated user actively participates? 2. Tests -> policy compliance, tool use and back-and-forth coordination. | Customer support bots, helpdesk agents, any product where the AI must guide a real human through a multi-step process. |
| MCP-Atlas (MCP = Model Context Protocol; Atlas is the benchmark name) | Agentic | 1. Can the model correctly use external tools and APIs via the Model Context Protocol? 2. Tests whether it picks the right tool, uses it correctly and handles the response. | Evaluating models for integration with real-world services — calendars, databases, search, etc. |
| OSWorld-Verified (Operating System World; verified split) | Agentic | Can the model control a real desktop GUI — clicking, typing, navigating apps — to complete tasks a human would do on a computer? | Computer-use agents, RPA, browser and desktop automation. |
| ARC-AGI-2 (Abstraction and Reasoning Corpus for Artificial General Intelligence, version 2) | Reasoning | 1. Can the model solve novel visual pattern puzzles it has never seen before? 2. Designed to resist memorisation — tests raw general reasoning, not learned answers. | Measuring true generalisation ability. Hard to fake with training data. |
| GPQA Diamond (Graduate-Level Google-Proof Q&A; Diamond is the hardest subset) | Knowledge | Can model solve Expert-level science questions (physics, chemistry, biology) written by PhD researchers — hard enough that most domain experts get them wrong. | Scientific research assistants, medical/legal tools, any use case requiring deep expert knowledge. |
| MMMLU (Multilingual Massive Multitask Language Understanding) | Knowledge | Tests general world knowledge and multilingual ability across 57 subjects. | General-purpose assistants, multilingual products, baseline knowledge capability comparisons. |
| GDPval-AA (GDP = Gross Domestic Product; val = validation/evaluation; AA = Artificial Analysis) | Agentic | 1. Evaluating AI Model Performance on Real-World Economically Valuable Task s 2. It tests AI models on real-world tasks across 44 occupations and 9 major industries. 3. Models are given shell access and web browsing capabilities in an agentic loop via Stirrup to solve tasks, with Elo ratings derived from blind pairwise comparisons. | Comparing models holistically for autonomous agent deployments. |
| MMMU-Pro (Massive Multi-discipline Multimodal Understanding, the Pro version) | Vision | College-level questions requiring both image understanding and reasoning — charts, diagrams, scientific figures. | Document analysis, research assistants, any product where the model reads images alongside text. |
| HLE (Humanity’s Last Exam) | Reasoning | Extremely hard questions across all domains, near-impossible even for top human experts. Tests the ceiling of model intelligence. | Frontier model comparisons, research tasks requiring the absolute highest level of reasoning. |
Types of Agents in IDE
Agent Execution Environments
Copilot agents run in three distinct environments.
| Type | Runs in | Triggered from |
|---|---|---|
| Local agent | Your machine | Chat view (agent dropdown) |
| Cloud agent | GitHub infrastructure | github.com/copilot/agents |
| Copilot CLI | GitHub infrastructure (async) | GitHub.com or VS Code |
- Local agents
- Run inside VS Code
- Full access to your local workspace, tools and local MCP servers
- Configured via .agent.md files
- Can be interactive or semi‑autonomous
- Selected from the Agents dropdown in the VS Code Chat view
- Can use tools, follow model preferences and hand off to other local agents
- Do NOT create branches automatically unless a tool explicitly does so
- Cloud agents (Coding agent)
- Run on GitHub’s infrastructure, not locally
- Fully autonomous: can edit files, create commits and open PRs
- .agent.md must be on the default branch (usually main)
- No access to local MCP servers
- Must use mcp-servers: in frontmatter to specify cloud‑reachable servers
- Always works through branches + pull requests
- Ideal for large refactors, documentation updates, or repo‑wide changes
- Copilot CLI
- Runs locally, outside VS Code
- Continues running even if VS Code closes
- Can create temporary worktrees to isolate changes
- Some commands may hand off to the cloud agent, which then creates a branch + PR
- Ideal for long‑running tasks, automation, or scripting
- Can trigger pushes if the command requires syncing or PR creation
Note: autonomous PRs, use a cloud or background agent.
Different Levels of Customization
Custom instructions are structured guidance that tells GitHub Copilot how to behave for a team, an individual, or a repository. Context Engineering.
Organization instructions
- Setup by GitHub admin at organization settings on GitHub.com.
- Apply to all organization members in Copilot Chat on GitHub.com.
- Enable discovery of org-level instructions in VS Code by setting
github.copilot.chat.organizationInstructions.enabledtotrue. - You might enforce VS Code settings via policy (Mobile Device Management(MDM) like Microsoft intune, Jamf, group policy, etc.)
- Refer GitHub documentation.
- Usecases:
- Never log sensitive user data
- Follow OWASP Guidelines
- comments should have personal information e.g. PII leak - vibe fix produces comment // fix for customer Joe whose birthday is on D0B is 29 Feb 1980 (leapyear).
Personal instructions
- Apply only to you, only, Good for quick personal preferences
- use the copilot chat to ask it to create a personal instruction (e.g. “All conversation with me must be in Spanish but use only English for any Code related stuffs like comments.” a file got created - ~/.config/Code/User/prompts/communication.instructions.md)
- To make it reflect in copilot - Set on GitHub.com under your profile picture → “Personal instructions”.
- Refer
- Usecases:
- Always respond in particular language, tone or level of detail.
- I am new to team give definition in brackets when you use a jargon.
Repository-wide instructions (.github/copilot-instructions.md)
| File | Scope |
|---|---|
Repository-wide .github/copilot-instructions.md and/or ~/.copilot/copilot-instructions.md | All files in the repo |
AGENTS.md | In workspace root or subfolders, All agents in the workspace (multi-agent support). BIG PICTURE GUIDE about AGENTS involved |
CLAUDE.md, .claude/CLAUDE.md, ~/.claude/CLAUDE.md, or CLAUDE.local.md | Claude Code compatibility |
- Always-on instructions — automatically included in every chat request.
- Applies to all files in the repository.
- The most broadly supported form — works across IDEs, GitHub.com chat and the coding agent.
Use copilot-instructions.md for:
When to use:
- Setting broad project standards
- security requirements
- Technology stack and libraries - to avoid or use
- naming conventions that apply across project
- coding style
- architecture patterns to avoid or use
- error handling
- Documentation standards
- Ensuring consistent behavior across all interactions
- Defining team conventions that apply everywhere
When NOT to use:
- For one-off tasks (use prompt files instead/skills/agents)
- This gets carried in all conversations and kept in context — keep it minimal
- When instructions should only apply conditionally (use path-specific or prompt files)
Where it works:
- All Copilot surfaces (VS Code, GitHub.com chat, coding agent, CLI).
- Repository-wide and path-specific work in VS Code, Visual Studio, JetBrains and the coding agent.
- Personal/organization instructions work in GitHub.com chat.
Examples:
- Injection Attacks: Always parameterize SQL queries — never concatenate user input into query strings
- XSS (Cross-Site Scripting): Never use
innerHTML,outerHTML, ordocument.write()with user-supplied data - PII & Sensitive Data - Never log PII — no emails, names, phone numbers, IP addresses
- “Follow coding standards”
- PEP 8 style guide for Python code
- Google Java Style guide: google.github.io/styleguide/javaguide.html
- “Use TypeScript interfaces for all data structures”
- “Include error handling in all public functions”
Path-specific instructions (.instructions.md files)
| Type | File | Scope |
|---|---|---|
| Path-specific | *.instructions.md in .github/instructions/ or custom locations | Files matching applyTo glob pattern |
| User-level | ~/.copilot/instructions/ or the instructions folder of your VS Code profile | Applies across all workspaces for that user |
- File-based instructions — conditionally applied based on glob patterns _(simpler regex alternative — string with wildcard characters like
_and?used to match file paths or strings)*. Best for language-specific conventions, framework patterns or rules that only apply to certain parts of your codebase. - One or more files named
NAME.instructions.mdinside the.github/instructions/directory (or other configured locations — see below). - Each file has an optional YAML frontmatter block with supported fields:
| Field | Required | Description |
|---|---|---|
name | No | Display name shown in the UI. Defaults to the file name. |
description | No | Short description shown on hover in the Chat view. |
applyTo | No | Glob pattern for automatic application (e.g. **/*.py). If omitted, the file is not applied automatically but can be manually attached. |
Example:
---
name: "Python Standards"
description: "Coding conventions for Python files"
applyTo: "**/*.py"
---

# Python coding standards

- Follow the PEP 8 style guide.
- Use type hints for all function signatures.
- Write docstrings for public functions.
- Instructions only activate when Copilot is working with files that match the
applyTopattern. Running/initor working on other files does not load path-specific instruction files into context. - Context efficiency: Unlike skills with progressive loading, path-specific instructions load their full contents into context when matched — and once the conversation continues, Copilot will not inject the instructions if it doesn’t apply anymore. Keep them minimal (max ~1,000 lines, ideally 200–300) to avoid overloading context. Focus only on non-obvious, project-specific conventions; skip rules already enforced by linters or formatters.
- Multiple patterns are separated by commas.
- If both a path-specific file and
copilot-instructions.mdapply to the same file, instructions from both are used. - Avoid conflicting instructions between them — Copilot’s behavior when instructions conflict is non-deterministic.
- Referencing other files: You can use standard Markdown links to reference other instruction files or URLs from within an instructions file (e.g.
Apply the [general coding guidelines](./general-coding.instructions.md) to all code.). - Referencing tools: To reference agent tools in your instructions, use the
#tool:<tool-name>syntax (e.g.#tool:web/fetch).
Supported in:
- Copilot Chat in VS Code, Visual Studio, JetBrains, Xcode and the Copilot coding agent.
- (Not supported in GitHub.com chat or mobile as of April 2026.)
Prompt Files
Prompt files (currently public preview, subject to change) are reusable, on-demand task prompts stored in your repository. Unlike custom instructions, they only run when you explicitly invoke them.
- File location:
.github/prompts/ - File extension:
.prompt.md - Supported in: VS Code, Visual Studio, JetBrains IDEs only.
Frontmatter fields:
| Field | Description |
|---|---|
agent | 'ask' (default chat), 'agent' (agent mode), 'plan' (planning mode), or the name of a custom agent |
description | A human-readable label shown in the IDE |
tools | Array of tools available to the prompt when running in agent mode |
Note: Some older examples use
mode, but the current VS Code prompt-file docs useagent(for example,agent: 'agent'oragent: 'ask'). Useagentin new files.
Dynamic input variables commonly use this syntax: ${input:variableName:placeholder text}. Most models understand this convention and ask for the missing values; for stricter interactive input, use the vscode/askQuestion tool.
How to invoke in VS Code:
- Open Copilot Chat, type
/filename(the filename without.prompt.md). - Or use the “Attach context” icon → “Prompt…” and select the file.
- Or type
/instructionsin the chat input to open the Configure Instructions and Rules menu. - You can optionally attach additional files for context alongside the prompt.
Generate a prompt file with AI: Type /create-prompt in chat and describe the workflow you want to automate. The agent generates a .prompt.md file for you.
Referencing instructions from prompt files: Prompt files can reference instructions files using Markdown links, keeping prompts clean and avoiding duplication.
Agent Skills
- Standardized approach unlike prompt files agentskills.io
- Agent Skills are reusable capability files that teach compatible tools how to perform a specific task.
- Agent Plugin is like an external ability Skill is more like an internal ability.
- If Agent skill is like a tool then Agent is like a tool box.
- Unlike prompt files, skills can be automatically invoked based on intent — you don’t need to explicitly call them every time.
- File location: project skills live under
- Project Specific
- .github/skills/«skill-name»/SKILL.md
- .claude/skills/«skill-name»/SKILL.md
- .agents/skills/«skill-name»/SKILL.md
- Personal (Global)
- ~/.copilot/skills/«skill-name»/SKILL.md
- ~/.claude/skills/«skill-name»/SKILL.md
- ~/.agents/skills/«skill-name»/SKILL.md
- File extension:
.md(always namedSKILL.md) - Supported in: GitHub Copilot cloud agent, Copilot CLI, VS Code agent mode, Claude Code and other compatible agent implementations.
- Frontmatter fields:
| Field | Required | Description |
|---|---|---|
name | Yes | Max 64 chars. Lowercase letters, numbers and hyphens only. Must not start/end with a hyphen or contain consecutive hyphens. Must match the parent directory name. |
description | Yes | Max 1024 chars. Describes what the skill does and when to use it. Used for intent matching. |
license | No | License name or reference to a bundled license file. |
compatibility | No | Max 500 chars. Indicates environment requirements (intended product, system packages, network access, etc.). |
metadata | No | Arbitrary key-value mapping for additional metadata. |
allowed-tools | No | Space-separated string of pre-approved tools the skill may use. (Experimental) |
user-invocable | No | Controls whether the skill appears in the slash command menu. |
disable-model-invocation | No | Prevents automatic skill invocation based on intent matching when set to true. |
- Skills do not support prompt-file fields such as
agent,mode,tools, ormodel. Skills also do not support dynamic input variables (${input:...}). - Progressive Loading/Progressive Disclosure: Only the
nameanddescriptionfrontmatter fields are loaded at startup (~100 tokens). The full skill body is loaded when the skill is activated and any referenced files (scripts, references, assets) are loaded only when required.
How to invoke:
- A compatible agent automatically invokes a skill when your intent matches the skill’s
description. - Manual invocation via slash commands (
/skill-name) is not part of the Agent Skills specification — support depends on the client implementation.
When to use:
- Encoding reusable, shareable expertise (e.g. “how we write migrations (mainframe cobol)”, “our PR review checklist”)
- Capabilities that should be available across sessions without manual invocation
- Sharing consistent workflows across team members or tools
When NOT to use:
- For one-off tasks (use prompt files instead)
- When you need dynamic user input or variables (use prompt files) — otherwise it depends on the client implementation
- When you need to control mode, tools, or model settings (use prompt files)
Example:
---
name: write-migration
description: Generates a database migration file following project conventions. Use when the user asks to create a migration or database schema change.
license: MIT
metadata:
  author: my-org
  version: "1.0"
---

# Write Migration

When asked to create a migration:

1. Use sequential numbering in the filename: `YYYYMMDD_description.sql`
2. Always include a rollback section.
3. Follow the schema conventions in `docs/schema.md`.
AGENTS.md
AGENTS.md is a simple, open format for guiding coding agents — think of it as a README for agents: a dedicated, predictable place to provide context and instructions to help AI coding agents work on your project.
It’s not the actual agent itself — it’s just the blueprint for the agent. GitHub’s custom agent is the actual agent.
Unlike
README.md(which targets human contributors), AGENTS.md contains the extra detail agents need: build steps, test commands and conventions that might clutter a README.File name:
AGENTS.md(placed at the repository root, or nested inside subpackages)Format: Plain Markdown — no frontmatter, no required fields, no special syntax. Use any headings you like.
Status: Open standard, stewarded by the Agentic AI Foundation under the Linux Foundation. AGENTS.md github. Examples
Supported in: OpenAI Codex, Amp, Cursor, Devin, Jules (Google), Factory, Aider, goose, opencode, Zed, Warp, VS Code, JetBrains Junie, Windsurf, RooCode, Gemini CLI, GitHub Copilot coding agent, Kilo Code, Semgrep, Augment Code, UiPath and others.
No required fields. AGENTS.md is plain Markdown. There is no frontmatter schema, no mandatory sections. You write whatever helps an agent work effectively on your project.
Recommended sections to include:
- Project overview
- Build and test commands
- Code style guidelines
- Testing instructions
- Security considerations
- Commit/PR conventions
Conflict resolution:
- The closest
AGENTS.mdto the file being edited takes precedence. - Explicit user chat prompts override everything.
- The closest
Monorepo support: Place a separate
AGENTS.mdinside each package. Agents automatically read the nearest file in the directory tree, so each subproject can have tailored instructions.Example:
# AGENTS.md

## Setup commands

- Install deps: `pnpm install`
- Start dev server: `pnpm dev`
- Run tests: `pnpm test`

## Code style

- TypeScript strict mode
- Single quotes, no semicolons
- Use functional patterns where possible

## PR instructions

- Title format: `[<project_name>] <Title>`
- Always run `pnpm lint` and `pnpm test` before committing.
When to use:
- Providing project-specific context that any coding agent needs to work on your repo
- Encoding build, test and style conventions once so every agent picks them up automatically
- Monorepos where individual packages need different instructions
When NOT to use:
- When you need structured, schema-validated metadata (AGENTS.md has no schema)
- When you need capability files that teach an agent how to perform a reusable task across projects (use Agent Skills / SKILL.md instead)
Custom Agents
- If skill is like a tool then Agent is like a tool box.
- Main differentiator is when you dont have a well defined structured series of step.
- Custom agents are specialized versions of the Copilot coding agent, configured with a defined persona, scope, memory and tool access.
- ability to iterate, decide, select and use tools, use memory, Reason
- They maintain their full configuration throughout an entire autonomous session — reading files, searching the codebase, editing files and opening pull requests.
- Custom agents are selected for a specific task and maintain their configuration for the entire autonomous workflow
- File location:
- Repository agents:
.github/agents/(must be committed to the default branch to appear in the UI atgithub.com/copilot/agents) - VS Code local/user agents: configured via
chat.agentFilesLocationssetting
- Repository agents:
- File extension:
.agent.md - Note: Custom agents were previously called “custom chat modes” in VS Code (files named
.chatmode.md). The terminology was updated to.agent.md. If you have existing.chatmode.mdfiles, rename them to.agent.md.
Frontmatter fields:
---
name: agent-name
description: What this agent does (shown in the UI)
tools: ["read", "search", "edit"]
model: ["Claude Opus 4.5", "GPT-5.2"] # Optional: tries models in order
handoffs: # Optional: transition to another agent
  - label: Implement Plan
    agent: agent
    prompt: Implement the plan outlined above.
    send: false
---
| Field | Description |
|---|---|
name | Display name in the UI |
description | Short description of the agent’s role |
tools | Array of tools the agent may use. See the Default Available Tools for VS Code Custom Agents section for a complete list. |
model | Optional. Specify preferred model(s) in priority order. |
handoffs | Optional. Define transitions to other agents. send: true auto-submits the handoff prompt; send: false pre-fills it for the user to review. |
The body of the file is the agent’s system prompt. It defines the agent’s role, capabilities and explicit limitations. A well-designed agent profile always includes a clear “do NOT” section to prevent scope creep.
How to use a custom agent (GitHub cloud agent):
- Commit the
.agent.mdfile to the default branch - Go to
https://github.com/copilot/agents - Select your repository, branch and agent from the dropdowns
- Type a task and press Enter — the agent runs autonomously and creates a PR
- Track progress in real time via the session view
How to use a custom agent (GitHub cloud agent) or VS Code:
- GitHub cloud agent: Commit the
.agent.mdfile to the default branch, go tohttps://github.com/copilot/agents, select your repository, branch and agent from the dropdowns, then type a task and press Enter. - VS Code: Select the agent from the agents dropdown in the Chat view, then type a task and start the session.
Generate an agent with AI: Type /create-agent in chat and describe the agent’s role to generate a .agent.md file.
When to use:
- Complex multi-step tasks requiring sustained context
- When you need the AI to maintain a specific role throughout a workflow
- Code review, refactoring, or development tasks that span multiple files
- When you want to limit tool access for security or focus
When NOT to use:
- For simple one-off tasks (use prompt files)
- When you need broad behavioral guidance (use custom instructions)
- For capabilities that should be shared across tools (use skills)
- When the task doesn’t require autonomy (use prompt files or skills)
Where it works: VS Code (local agents), GitHub.com (cloud agents via github.com/copilot/agents). Cloud agents work with the coding agent.
Examples:
- “Code review agent” for automated PR reviews
- “Bug fixer agent” for debugging workflows
- “Documentation specialist” for generating docs
Agent Plugins
Instructions here
Agent plugins are prepackaged bundles of chat customizations that you can discover and install from plugin marketplaces in Visual Studio Code. A single plugin can provide any combination of slash commands, agent skills, custom agents, hooks and MCP servers.
Plugin is like an external ability Skill is more like an internal ability.
Plugins work alongside your locally defined customizations. When you install a plugin, its commands, skills, agents, hooks and MCP servers appear in chat.
Note: Agent plugins are currently in preview. Enable or disable support for agent plugins with the
chat.plugins.enabledsetting.What plugins provide
- An agent plugin can bundle one or more of the following customization types:
- Slash commands: additional commands you can invoke with
/in chat - Skills: agent skills with instructions, scripts and resources that load on-demand
- Agents: custom agents with specialized personas and tool configurations
- Hooks: hooks that execute shell commands at agent lifecycle points
- MCP servers: MCP servers for external tool integrations
- Slash commands: additional commands you can invoke with
- For example, a testing plugin might include a
test-runnerskill with scripts, atest-revieweragent with read-only tools and an MCP server for a test reporting dashboard.
- An agent plugin can bundle one or more of the following customization types:
Plugin directory structure
my-testing-plugin/
├── plugin.json              # Plugin metadata and configuration
├── skills/
│   └── test-runner/
│       ├── SKILL.md         # Testing skill instructions
│       └── run-tests.sh     # Supporting script
├── agents/
│   └── test-reviewer.agent.md # Code review agent
├── hooks/
│   └── hooks.json           # Hook configuration
├── scripts/
│   └── validate-tests.sh    # Hook script
└── .mcp.json                # MCP server definitions
Once installed, plugin-provided customizations appear alongside your locally defined ones. For example, skills from a plugin show up in the Configure Skills menu and MCP servers from a plugin appear in the MCP server list.
Caution: Plugins can include hooks and MCP servers that run code on your machine. Review the plugin contents and publisher before installing, especially for plugins from community marketplaces.
Discovering and installing plugins
- Open the Extensions view (Ctrl+Shift+X) and enter
@agentPluginsin the search field. - Browse the list of available plugins from your configured marketplaces.
- Select Install to install a plugin in your user profile.
The first time you install a plugin from a new marketplace, VS Code shows a trust prompt. Review the marketplace source before confirming.
Alternatively, you can install a plugin directly from a Git repository URL by running Chat: Install Plugin From Source from the Command Palette.
Configuring plugin marketplaces
By default, VS Code discovers plugins from the copilot-plugins and awesome-copilot GitHub repositories. You can add additional marketplaces with the chat.plugins.marketplaces setting.
Marketplaces are Git repositories that contain plugin definitions. You can reference them in several formats:
- Shorthand:
owner/repofor public GitHub repositories (e.g.,anthropics/claude-code) - HTTPS git remote: a full URL ending in
.git - SCP-style git remote: SSH-style references
- file URI: a
file:///path to a marketplace repository already cloned on disk
Managing installed plugins
The Agent Plugins - Installed view in the Extensions view shows the plugins you have installed. From this view, you can enable, disable, or uninstall plugins.
You can also manage installed plugins from the Chat view by selecting the gear icon > Plugins.
Plugins sourced from npm or PyPI never update automatically. Instead, they show an Update button in the Extensions view. Selecting the button prompts you to confirm before running the install command.
Cross-tool compatibility
The plugin format is shared between VS Code, GitHub Copilot CLI and Claude Code. A single plugin repository can work across all three tools.
Key differences to be aware of across tools:
- Hook file location: Claude-format plugins expect hooks in
hooks/hooks.json, while Copilot-format plugins usehooks.jsonat the root. VS Code detects the format automatically. - Plugin root token: Claude-format plugins use
${CLAUDE_PLUGIN_ROOT}to reference files within the plugin directory. This token is not available in Copilot-format plugins. - Skill naming: All tools require plain kebab-case names in
SKILL.md. Namespace prefixes cause silent load failures.
When to use:
- Standardized workflows you want to trigger manually
- Tasks requiring user input or variables
- One-off automation (code generation, refactoring, analysis)
- When you want to share reusable task templates with your team
When NOT to use:
- For persistent behavior (use custom instructions)
- When the task should run automatically (use skills or hooks)
- For complex autonomous workflows (use custom agents)
- When you need to package capabilities for sharing across tools (use skills or plugins)
Where it works: VS Code, Visual Studio, JetBrains only. Not supported in GitHub.com chat or the coding agent.
Examples:
- “Generate unit tests for this function”
- “Refactor this code to use async/await”
- “Create a README for this project”
MCP Servers in GitHub Copilot
- Model Context Protocol is an open standard protocol that provides a universal approach for applications to provide context to language models.
- Read More
- Configuring MCP Servers (
mcp.json)- MCP servers are configured in
.vscode/mcp.json. This file tells VS Code which servers to start and how to connect to them.
- MCP servers are configured in
Syntax:
{
  "servers": {
    "server-name": {
      "type": "stdio",
      "command": "npx",
      "args": ["-y", "@scope/mcp-server-name"],
      "env": {
        "API_KEY": "${input:apiKey}"
      }
    },
    "airbnb": {
      "type": "stdio",
      "command": "npx",
      "args": ["-y", "@openbnb/mcp-server-airbnb", "--ignore-robots-txt"]
    }
  }
}
- Once configured, reference it in an agent’s tools array using
airbnb/*or a specific tool name likeairbnb/search_listings.
Key fields:
| Field | Description |
|---|---|
type | Transport type: http (http streaming), stdio (local process) or sse (remote HTTP) |
command | The executable to run |
args | Arguments passed to the command |
env | Environment variables — use ${input:varName} for secrets prompted at runtime, or reference VS Code secrets |
Note:
mcp.jsonis workspace-scoped. Commit it to version control so the whole team shares the same server configuration. Store secrets in VS Code’s secret storage or as environment variables — never hardcode them.
- invoking via a prompt file. This Queries your open PRs, assigned issues and new repository activity — then writes a dated
Tasks.mdto your workspace.
Save as .github/prompts/daily-tasks.prompt.md:
---
description: "Generate my daily standup task list"
agent: "agent"
tools: ["github", "create_file"]
---

You are acting as a Scrum Master. Use the GitHub MCP server to:

1. Get all open pull requests assigned to me
2. Get all open issues assigned to me
3. Get issues opened in the last 24 hours in this repository

Then create a file named `Tasks-${input:date:Todays date e.g. 2026-04-16}.md` with the following structure:

# Daily Tasks — <date>

## My Open Pull Requests

- List each PR with title, number and URL

## My Assigned Issues

- List each issue with title, number, priority label if present and URL

## New Issues Today

- List each new issue with title, number and who opened it

## Focus for Today

Based on the above, suggest the top 3 priorities in order of urgency.

Keep the tone concise — this is a standup reference, not a report.
How to run it:
- Open Copilot Chat in VS Code
- Type
/daily-tasks - Enter today’s date when prompted
- Copilot queries GitHub via MCP and writes the file
Tip: Pin this prompt to your VS Code toolbar or bind it to a task in
.vscode/tasks.jsonso it runs with a single keystroke each morning.
GitHub CLI + Copilot
The GitHub CLI (gh) brings Copilot directly into your terminal — useful when you’re already working in the command line and don’t want to context-switch to an IDE.
Install from here : https://cli.github.com
gh copilot suggest- Translates a natural language description into a shell command.
gh copilot suggest "delete all merged git branches locally"- Copilot returns a command, explains it and asks whether to run it, copy it, or revise it. It will not execute anything without your confirmation.
- Use this when:
- You know what you want to do but not the exact command
- You’re working with unfamiliar CLI tools (
kubectl,ffmpeg,awk) - You want a safe way to construct destructive commands before running them
gh copilot explain- Explains what a shell command does in plain English.
gh copilot explain "git rebase -i HEAD~3"- Use this when:
- You’ve inherited a script and need to understand it before running it
- You find a command in documentation and want a plain-English breakdown
- You’re onboarding someone to your runbooks
gh alias-bash gh alias set cs 'copilot suggest' gh alias set ce 'copilot explain' gh cs "compress all jpg files in this folder" gh ce "rsync -avz --delete src/ user@host:/var/www/"Note:
gh copilotworks on shell commands only — it has no awareness of your codebase, open files, or MCP servers. For anything requiring code context, use the IDE.
Hooks
Hooks provide deterministic, code-driven automation. Unlike instructions or custom prompts that guide agent behavior, hooks execute your code at specific lifecycle points with guaranteed outcomes.
Hooks enable you to execute custom shell commands at strategic points in an agent’s workflow, such as when an agent session starts or ends, or before and after a prompt is entered or a tool is called. Hooks receive detailed information about agent actions via JSON input, enabling context-aware automation.
The key distinction from instructions: writing “please don’t run dangerous commands” in a .instructions.md file is guidance. Returning deny from a preToolUse hook is enforcement — it fires every time, regardless of how the agent was prompted.
Generate a hook file with /create-hook in chat.
File Location
Copilot agents support hooks stored in JSON files in your repository at .github/hooks/*.json. The hooks configuration file must be present on your repository’s default branch to be used by Copilot cloud agent. For GitHub Copilot CLI, hooks are loaded from your current working directory.
You can have multiple hook files — all *.json files in .github/hooks/ are loaded. This lets you split hooks by concern (e.g. security.json, formatting.json, audit.json).
Supported in: Copilot cloud agent, Copilot CLI, VS Code (Preview).
Note (VS Code): VS Code uses PascalCase hook event names, while the CLI and cloud agent use camelCase names. VS Code automatically converts between the two formats when reading CLI-format hook files.
Hook Triggers
| Hook | When it fires | Primary use |
|---|---|---|
sessionStart / SessionStart | When a new agent session begins or an existing one resumes | Initialize environments, validate project state, log session starts for auditing |
sessionEnd / Stop | When the agent session completes or is terminated | Clean up temp resources, archive session logs, send notifications |
userPromptSubmitted / UserPromptSubmit | When the user submits a prompt to the agent | Log requests for auditing and usage analysis |
preToolUse / PreToolUse | Before the agent uses any tool (bash, edit, view, etc.) | Block dangerous commands, enforce security policies, require approval for sensitive operations |
postToolUse / PostToolUse | After the agent uses a tool | Run formatters/linters after edits, validate outputs, trigger external integrations |
PreCompact | Before VS Code compacts the chat context | Inject or preserve important context |
SubagentStart / SubagentStop | When a VS Code subagent starts or stops | Log or coordinate multi-agent work |
preToolUse/PreToolUseis the most powerful hook — it is the one that can allow, deny, or ask before a tool execution happens.
Configuration Format
Each hook file follows this structure:
{
  "version": 1,
  "hooks": {
    "preToolUse": [
      {
        "type": "command",
        "bash": "./scripts/my-hook.sh",
        "powershell": "./scripts/my-hook.ps1",
        "cwd": "scripts",
        "timeoutSec": 30
      }
    ],
    "postToolUse": [
      {
        "type": "command",
        "bash": "./scripts/post-edit.sh"
      }
    ]
  }
}
Key fields:
| Field | Description |
|---|---|
type | Always "command" |
bash | Shell script path for macOS/Linux |
powershell | Script path for Windows |
cwd | Working directory for the script (relative to repo root) |
timeoutSec | Max seconds before the hook is killed (prevents hung sessions) |
Input: What Hooks Receive
Every hook script receives a JSON object on stdin. The shape varies by hook type, but preToolUse — the most commonly used — provides:
{
  "timestamp": 1704614400000,
  "cwd": "/path/to/project",
  "toolName": "bash",
  "toolArgs": "{\"command\": \"rm -rf ./dist\"}"
}
Read it in your script with:
INPUT=$(cat)
TOOL_NAME=$(echo "$INPUT" | jq -r '.toolName')
TOOL_ARGS=$(echo "$INPUT" | jq -r '.toolArgs')
Output: How Hooks Control the Agent
Hooks communicate back to the agent via stdout as JSON. All hooks support these top-level fields:
| Field | Type | Effect |
|---|---|---|
continue | boolean | false stops the entire agent session |
stopReason | string | Message shown to the user explaining why the session stopped |
systemMessage | string | Injected into the model’s context (e.g. to provide extra info) |
preToolUse additionally supports:
| Field | Type | Effect |
|---|---|---|
permissionDecision | "allow" | "deny" | "ask" | Explicitly allow, block, or ask before the tool call |
permissionDecisionReason | string | Shown to the model when the decision is "deny" |
Cloud-agent note: GitHub’s cloud-agent hook reference currently emphasizes
denyas the supported enforcement decision forpreToolUse; VS Code and Copilot CLI documentallow,denyandask.
Exit codes are the simplest control mechanism:
- Exit
0— hook passed, agent continues normally - Exit
2— blocks the operation;stderris shown to the model as context. No JSON output needed. - Any non-zero exit — treated as an error
Example: Block Dangerous Shell Commands
#!/bin/bash
INPUT=$(cat)
TOOL_NAME=$(echo "$INPUT" | jq -r '.toolName')
TOOL_ARGS=$(echo "$INPUT" | jq -r '.toolArgs')

if [ "$TOOL_NAME" = "bash" ]; then
  # Block rm -rf on root or important dirs
  if echo "$TOOL_ARGS" | grep -qE 'rm -rf /(etc|usr|home|root)'; then
    echo '{"permissionDecision":"deny","permissionDecisionReason":"Refusing to delete system directories."}'
    exit 0
  fi
fi
Example: Auto-format After Every File Edit
#!/bin/bash
INPUT=$(cat)
TOOL_NAME=$(echo "$INPUT" | jq -r '.toolName')

if [ "$TOOL_NAME" = "edit" ] || [ "$TOOL_NAME" = "create" ]; then
  npx prettier --write .
fi
Example: Audit Log Every Tool Call
#!/bin/bash
INPUT=$(cat)
TOOL_NAME=$(echo "$INPUT" | jq -r '.toolName')
TIMESTAMP=$(echo "$INPUT" | jq -r '.timestamp')
USER=${USER:-unknown}

echo "$TIMESTAMP,$USER,$TOOL_NAME" >> /var/log/copilot/usage.csv
Example: Run Linter Before Edits
#!/bin/bash
INPUT=$(cat)
TOOL_NAME=$(echo "$INPUT" | jq -r '.toolName')

if [ "$TOOL_NAME" = "edit" ] || [ "$TOOL_NAME" = "create" ]; then
  npm run lint-staged
  if [ $? -ne 0 ]; then
    echo '{"permissionDecision":"deny","permissionDecisionReason":"Code does not pass linting."}'
  fi
fi
Testing Hooks Locally
Before committing, validate your hook by piping test input directly:
# Pipe a test preToolUse payload into your script
echo '{"timestamp":1704614400000,"cwd":"/tmp","toolName":"bash","toolArgs":"{\"command\":\"ls\"}"}' | ./scripts/my-hook.sh

# Check the exit code
echo $?

# Validate the output is valid JSON
./scripts/my-hook.sh | jq .
Enable debug output in the script itself during development:
#!/bin/bash
set -x  # print every command as it runs
INPUT=$(cat)
echo "DEBUG: $INPUT" >&2
When to use
- Security enforcement — block commands like
rm -rf,DROP TABLE, or writes to production config files before they execute - Compliance and auditing — log every tool call, command, or file edit for traceability
- Code quality gates — run formatters or linters automatically after every file modification
- Context injection — add project-specific environment variables or state to the agent’s context at session start
- Approval workflows — automatically approve safe operations and require human confirmation for sensitive ones
When NOT to use
- For guidance and conventions — use custom instructions or
copilot-instructions.mdinstead - For reusable task workflows — use prompt files or agent skills instead
- For simple one-off tasks where a prompt is sufficient
Security Considerations
Hooks execute shell commands with the same permissions as VS Code. Review hook configurations carefully, especially when using hooks from untrusted sources.
- Review all hook scripts before enabling them, especially in shared repositories
- Use least privilege — hooks should only access what they need
- Validate and sanitize input — hook scripts receive JSON from the agent; treat it as untrusted input
- Never hardcode secrets in hook scripts — use environment variables or secret storage
- Hooks committed to the repo go through code review like any other code. Rollbacks are a single
git revert.
Reference: About hooks · Hooks configuration reference · Agent hooks in VS Code
Copilot Spaces (formerly Knowledge Bases)
Note: GitHub Copilot Knowledge Bases were retired on November 1, 2025 and fully replaced by Copilot Spaces. If you have existing knowledge bases, they can be migrated using the “Convert to Space” button under each knowledge base in your organization settings.
Copilot Spaces let you organize the context that Copilot uses to answer your questions. Spaces can include repositories, code, pull requests, issues, free-text content like transcripts or notes, images and file uploads. You can ask Copilot questions grounded in that context, or share the space with your team to support collaboration and knowledge sharing.
Unlike instruction files which shape how Copilot behaves, Spaces control what Copilot knows for a specific task or topic.
Anyone with a Copilot license, including Copilot Free, can create and use Spaces.
Creating a Space
To create a space, go to https://github.com/copilot/spaces and click Create space. Give your space a name, then choose whether the space is owned by you or by an organization you belong to.
Each space has two configuration fields:
- Instructions — Free text telling Copilot what to focus on within this space: its areas of expertise, what kinds of tasks it should help with and what it should avoid.
- Sources — The context Copilot searches when answering questions.
What You Can Add as Sources
You can add files, folders and entire GitHub repositories. You can also paste URLs of GitHub content including pull requests and issues, upload files directly from your local machine (images, text files, rich documents, spreadsheets), or type or paste free-text content such as transcripts or notes.
Two Source Attachment Strategies
How you attach a source significantly affects response quality:
| Strategy | How it works | Best for |
|---|---|---|
| Attach a repository | Copilot doesn’t load the entire project into memory — it searches the repository and retrieves only the most relevant content for your question. | Large-scale use cases, answering questions across all documentation |
| Attach individual files | The file’s full contents are loaded into Copilot’s context window and considered for every query in that space. | When you want Copilot to consistently prioritize a specific document |
Tip: You can add files to a space directly from the code view on GitHub without breaking your flow — at the top of any file, click the dropdown and select the space you want to add it to.
Keeping Spaces Up to Date
Your spaces stay in sync as your project evolves. GitHub files and other GitHub-based sources added to a space are automatically updated as they change, making Copilot an evergreen expert in your project. Uploaded local files are not auto-synced and need to be refreshed manually.
Sharing Model
| Space type | Sharing options |
|---|---|
| Personal | Private, shared publicly, or shared with specific GitHub users |
| Organization-owned | Admin, editor, or viewer access for org members — or hidden entirely |
Organization-owned spaces can be shared with other organization members and you decide which level of access to grant. Alternatively, you can choose to grant “No access” to organization members and keep the space hidden.
Using Spaces in Your IDE
You can leverage Copilot Spaces in your IDE using the GitHub MCP server to access context from your spaces. This allows you to leverage your curated context while coding without switching between your IDE and the web interface.
Spaces can only be used in agent mode in your IDE, since spaces are accessed via the GitHub MCP server. Open Copilot Chat, select Agent from the agent dropdown, then confirm that the get_copilot_space and list_copilot_spaces tools are listed and enabled under the GitHub MCP server entry.
Then reference your space naturally in a prompt:
Using the Copilot space 'Checkout Flow Redesign' owned by myorganization, summarize the implementation plan.
Note: When using Spaces in your IDE, repository context and uploaded files are not supported. You will have access to text content, GitHub files, issues, pull requests and space instructions.
Use Cases
Create a space when you start working on a specific feature. Add the relevant code, a product specification and any supporting materials such as notes from a design review or mockup images.
Other strong use cases:
- Standardize repetitive tasks — Document the logic for tasks like tracking telemetry events once, then share it through a space to keep everyone consistent.
- Scale institutional knowledge — Create a space for topics where people tend to ask similar questions, such as how authentication or search works in your project.
- Onboarding — Give new team members instant access to curated project knowledge without requiring them to dig through repos.
- Sharing best practices — Generate code that follows security patterns, API standards and team preferences, or share SQL/KQL queries and telemetry schemas.
When to use
- Grounding Copilot in context that lives outside your current working files
- Knowledge that needs to be shared across team members without relying on repo files
- Task-specific context you want to assemble once and reuse (e.g. a feature redesign space with the spec, relevant code and meeting notes)
- Answering recurring questions about a subsystem (auth, payments, search)
When NOT to use
- When the context is already in your open workspace — use
#codebaseor#fileinstead - For behavioral rules and coding conventions — use
copilot-instructions.mdor.instructions.mdinstead - For reusable task workflows — use prompt files or agent skills instead
Billing Note
Questions you submit in a space count as Copilot Chat requests. If you’re a Copilot Free user, this usage counts toward your monthly chat limit. If you use Spaces with a premium model, this usage counts toward your premium usage quota.
Reference: About GitHub Copilot Spaces · Creating a Space · Using Spaces in your IDE
File Location Reference
your-repo/
└── .github/
    ├── copilot-instructions.md                ← Repository-wide instructions (all surfaces)
    │
    ├── instructions/                           ← Default path-specific instructions folder
    │   ├── python.instructions.md             ← Requires applyTo: "**/*.py" in frontmatter
    │   ├── typescript.instructions.md         ← applyTo: "**/*.{ts,tsx}"
    │   ├── frontend/
    │   │   └── react.instructions.md          ← Organized in subdirectories
    │   └── testing/
    │       └── unit-tests.instructions.md
    │                                           VS Code, Visual Studio, coding agent only
    │
    ├── prompts/
    │   ├── explain-code.prompt.md             ← Invoke with /explain-code in IDE chat
    │   └── create-readme.prompt.md            ← VS Code, Visual Studio, JetBrains only
    │
    └── agents/
        ├── readme-specialist.agent.md         ← Must be on default branch
        └── bug-fix-teammate.agent.md          ← Selected at github.com/copilot/agents

AGENTS.md                                      ← Multi-agent always-on (workspace root)
CLAUDE.md                                      ← Claude Code compatibility (workspace root)
.claude/CLAUDE.md                              ← Alternative Claude.md location
CLAUDE.local.md                                ← Local-only, not committed to version control
Comprehensive Comparison Table
| Feature | Custom Instructions | AGENTS.md | Prompt Files | Custom Agents | Agent Skills | Hooks | MCP Servers | Agent Plugins |
|---|---|---|---|---|---|---|---|---|
| Primary Purpose | Persistent Copilot behavior guidance | Portable project guidance for coding agents | One-off task execution | Autonomous workflows | Reusable capabilities | Lifecycle automation | External integrations | Packaged customizations |
| Scope | All interactions, or files matched by applyTo | Workspace-wide from root; folder-specific with nested files | Single invocation | Session-based | Persistent across sessions | Event-triggered | Tool-extended | User/workspace until uninstalled |
| Triggering | Automatic (always-on or path-matched) | Automatic when supported and enabled | Manual (/filename) | Manual selection | Auto (intent) or manual (/skill-name) | Automatic (lifecycle events) | Via tools in agents | As per bundled components |
| Persistence | Always active when matched | Always active for matching workspace/folder context | Per invocation | Per session | Always available | Event-based | Always running (when enabled) | Until uninstalled |
| User Input Support | No | No | Yes (${input:...}) | Via prompts | No | Via scripts | Via server config | Depends on components |
| Tool Access | N/A | N/A | Configurable | Configurable | N/A | Shell commands | External APIs | As per bundled components |
| File Location | .github/copilot-instructions.md, *.instructions.md | AGENTS.md at workspace/repo root; nested AGENTS.md for subfolders when supported | .github/prompts/ | .github/agents/, local paths | .github/skills/<<name>>/SKILL.md, .claude/skills/<<name>>/SKILL.md, .agents/skills/<<name>>/SKILL.md, or user skill folders | hooks.json, workspace hooks | .vscode/mcp.json | Installed from marketplaces or Git repos |
| IDE Support | VS Code, Visual Studio, JetBrains, GitHub.com, CLI, coding agent | VS Code, Copilot CLI, coding agent; also supported by many non-Copilot coding agents | VS Code, VS, JetBrains | VS Code, GitHub.com (cloud) | VS Code, CLI, agent, Claude Code | VS Code | VS Code, CLI, agent | VS Code, CLI, Claude Code |
| Cross-Tool Compatibility | Medium-high (strongest inside Copilot surfaces) | High (open Markdown convention) | Low (IDE-only) | Medium (VS Code + GitHub) | High (all tools) | Low (VS Code-only) | High (protocol-based) | High (shared format) |
| Frontmatter: agent | N/A | ❌ | ✅ (ask, agent, plan, or custom agent name) | N/A | ❌ | N/A | N/A | N/A |
| Frontmatter: tools | N/A | ❌ | ✅ | N/A | ❌ | N/A | N/A | N/A |
| Frontmatter: model | N/A | ❌ | ✅ | N/A | ❌ | N/A | N/A | N/A |
| Frontmatter: user-invocable | N/A | ❌ | ❌ | N/A | ✅ | N/A | N/A | N/A |
| Frontmatter: disable-model-invocation | N/A | ❌ | ❌ | N/A | ✅ | N/A | N/A | N/A |
| Progressive Loading | No | No | No | No | Yes — only name/description at startup; full body on demand | No | No | Yes — components loaded on demand |
| Bundling | N/A | Single Markdown file per scope | Single file | N/A | Single skill | N/A | N/A | Multiple types (skills, agents, hooks, MCP servers, etc.) |
| Generation Method | Manual or /init | Manual | /create-prompt | /create-agent | /create-skill | /create-hook | Manual config | Install from marketplace |
| Status | GA | Open standard / supported instruction file | Public preview | GA | GA | GA | GA | Preview |
| Best For | Standards, conventions | Build/test commands and conventions shared across multiple AI agents | Quick tasks, templates | Complex workflows | Shareable expertise | Automation, policies | External data access | Team tooling, complex setups |
| Security Considerations | Low (text only) | Low (text only; can influence commands an agent chooses to run) | Low (local execution) | Medium (tool access) | Low (intent-based) | High (shell execution) | High (external access) | High (review before install) |
| Maintenance | Update files in repo | Update nearest relevant AGENTS.md | Update prompt files | Update agent files | Update skill files | Update hook scripts | Update server config | Plugin updates via marketplace |
AGENTS.md sources checked: VS Code custom instructions, GitHub Copilot CLI custom instructions and agents.md FAQ.
The VS Code docs expose two additional customization types beyond what the 19 GitHub library examples cover.
VS Code
Other VS Code AI Coding Tips
- Install the opencode extension if you want a Copilot-adjacent agent inside VS Code that can also run from the terminal or desktop app.
- opencode includes access to free models through OpenCode Zen and can also connect to many providers, including local models. Treat the exact free model list as changeable, but it is useful when you want to experiment without burning through Copilot premium requests.
- Good workflow: use Copilot for tight VS Code integration and quick inline help, then use opencode when you want a model-agnostic coding agent, parallel sessions, or provider flexibility.
- [Warning]
/ Slash Commands — Built-in custom instructions Actions
You can also use slash commands in chat to generate any type of customization file directly:
| Command | Output |
|---|---|
/init | Workspace-wide copilot-instructions.md |
/create-instructions | Targeted .instructions.md file |
/create-prompt | .prompt.md file |
/create-agent | .agent.md file |
/create-skill | Agent skill file |
/create-hook | Hook file |
VS Code Copilot Chat uses three special prefix characters to structure prompts. Each serves a distinct purpose.
/ Slash Commands — Built-in Chat Actions
Slash commands are shorthand prompts for common coding tasks. Type / in the chat input to see the full list available in your current context. These are the built-in commands (separate from the file-generation commands like /create-agent):
| Command | What it does |
|---|---|
/explain | Explains the selected code or a concept in plain English |
/fix | Suggests a fix for a bug, error, or linting issue in the selection |
/tests | Generates unit tests for the selected function or class |
/doc | Adds documentation comments (JSDoc, docstrings, etc.) to the selected code |
/new | Scaffolds a new project or file based on your description |
/newNotebook | Creates a new Jupyter notebook based on your description |
/terminal | Explains or suggests terminal/shell commands |
/search | Searches the codebase semantically for relevant code |
/clear | Clears the current chat session |
/help | Shows available commands and how to use Copilot Chat |
/compact | Summarises the conversation history to free up context window space. You can also add custom focus instructions: /compact focus on the database schema decisions |
Note: Your custom prompt files (
.github/prompts/*.prompt.md) also appear as slash commands — invoked as/filename. These appear at the top of the list when you type/. The file-generation commands (/init,/create-agent, etc.) listed in the customization section above are also slash commands, just scoped to creating configuration files.
# Context Variables — Hash Mentions
#-mentions let you explicitly attach specific context to your prompt. Type # in the chat input to see the full list. Unlike implicit context (which Copilot infers automatically), #-mentions give you precise control over what goes into the prompt.
| Variable | What it attaches |
|---|---|
#file | A specific file from your workspace. Opens a file picker. |
#codebase | Triggers a semantic search across your entire workspace to find the most relevant files automatically |
#selection | The current text selection in the active editor |
#editor | The entire contents of the active editor |
#terminalSelection | The current text selection in the integrated terminal |
#terminalLastCommand | The last command run in the terminal and its output |
#problems | Errors and warnings currently shown in the Problems panel |
#changes | The diff of your current uncommitted source control changes |
#fetch | Fetches content from a URL you provide and adds it as context |
#symbol | A specific code symbol (function, class, variable) — opens a symbol picker |
#<filename> | Type # followed by a filename directly (e.g. #index.ts) to attach that file |
Usage tips:
- Combine multiple
#-mentions in a single prompt:Refactor #file and make sure it follows the patterns in #file - Use
#codebasewhen you want Copilot to autonomously decide which files are relevant, rather than picking them manually #fetchis particularly useful for referencing external docs or API specs:Implement this endpoint following #fetch https://api.example.com/docs#changesis ideal for prompts like “write a commit message for #changes” or “review #changes for security issues”- In agent mode, Copilot automatically gathers its own context —
#-mentions are most useful in ask/edit modes where context is not gathered autonomously
@ Chat Participants — Specialist Agents
@-mentions invoke specialized chat participants — domain experts optimized for specific contexts. Type @ in the chat input to see available participants.
| Participant | Specialty |
|---|---|
@workspace | Answers questions about your entire project — file structure, search across files, architecture questions |
@vscode | Answers questions about VS Code itself — settings, keybindings, extensions, commands |
@terminal | Helps with shell commands and explains terminal errors |
@github | GitHub-specific skills: queries PRs, issues, repositories and runs GitHub Actions awareness. Dynamically picks the right skill based on your question |
Usage tips:
@workspaceis the go-to for codebase questions:@workspace where is the authentication logic?@vscodefor IDE help:@vscode how do I configure the formatter to run on save?@githubfor repo-level context:@github what issues are assigned to me?or@github summarize the recent PRs- Third-party extensions can register their own
@participants (e.g.@docker,@databases)
Quick Reference
/command     → shorthand for a built-in task (explain, fix, tests, doc…)
/prompt-name → invoke your custom .prompt.md file
#item        → attach specific context (file, codebase, selection, terminal…)
@participant → invoke a specialist (workspace, vscode, terminal, github)
Combining all three in one prompt:
@workspace using the patterns in #file:src/api/auth.ts, /fix the issue in #selection
Keyboard Shortcuts (VS Code)
| Action | macOS | Windows / Linux |
|---|---|---|
| Open Chat view | Ctrl⌘I | Ctrl+Alt+I |
| Open Inline Chat (in editor) | ⌘I | Ctrl+I |
| Open Quick Chat (floating) | ⇧⌥⌘L | Ctrl+Shift+Alt+L |
| Start new chat session | ⌘N (in Chat view) | Ctrl+N |
| Switch to agent mode | ⇧⌘I | Ctrl+Shift+I |
CLAUDE.md Files (VS Code only)
VS Code automatically detects CLAUDE.md and applies it as always-on instructions, similar to AGENTS.md. This is specifically for compatibility with Claude Code or other Claude-based tools so a single file works across all of them.
VS Code searches for CLAUDE.md in these locations:
| Location | Description |
|---|---|
| Workspace root | CLAUDE.md at the root of your workspace |
.claude folder | .claude/CLAUDE.md in your workspace |
| User home | ~/.claude/CLAUDE.md for personal instructions across all projects |
| Local variant | CLAUDE.local.md for local-only instructions (not committed to version control) |
Enable/disable support with the chat.useClaudeMdFile setting.
VS Code Settings & Configuration
Configure VS Code behavior with these settings in .vscode/settings.json or your user settings:
Path-specific instruction file locations
The default search location is .github/instructions/. Configure additional locations via the chat.instructionsFilesLocations setting:
{
  "chat.instructionsFilesLocations": {
    ".github/instructions": true,
    ".claude/rules": true,
    "~/.copilot/instructions": false,
    "~/.claude/rules": false
  }
}
VS Code searches all configured folders recursively, allowing you to organize files in subdirectories.
Custom agent file locations
Enable org-level custom agents and configure local agent file paths:
{
  "github.copilot.chat.organizationCustomAgents.enabled": true,
  "chat.agentFilesLocations": [".github/agents"],
  "github.copilot.chat.organizationInstructions.enabled": true
}
Commit message generation configuration
Configure instructions for commit message generation:
{
  "github.copilot.chat.commitMessageGeneration.instructions": [
    { "file": ".github/commit-instructions.md" }
  ]
}
Instruction behavior toggles
Control which instruction types are applied:
{
  "chat.includeApplyingInstructions": true,
  "chat.includeReferencedInstructions": true,
  "chat.useAgentsMdFile": true,
  "chat.useClaudeMdFile": true
}
Instruction Priority (VS Code)
When multiple types of custom instructions exist, they are all provided to the AI. When conflicts occur, higher-priority instructions take precedence:
- Personal instructions (user-level) — highest priority
- Repository instructions (
.github/copilot-instructions.mdorAGENTS.md) - Organization instructions — lowest priority
Syncing Instructions Across Devices
VS Code can sync your user instructions files across multiple devices using Settings Sync. Run Settings Sync: Configure from the Command Palette and enable Prompts and Instructions from the sync list.
Diagnostics: Troubleshooting Instructions
Use the chat customization diagnostics view to see all loaded instruction files and any errors. Right-click in the Chat view and select Diagnostics.
Common reasons instructions fail to apply:
- Wrong file location —
.github/copilot-instructions.mdmust be in.github/at the workspace root.*.instructions.mdfiles must be in a folder listed inchat.instructionsFilesLocations(or its subdirectories). applyToglob doesn’t match the files being worked on. Check the References section in the chat response to confirm which instructions were used.- Relevant settings are disabled. Check the instruction behavior toggles listed above.
Generating Instructions with AI (VS Code)
Generate workspace-wide instructions: Type /init in the chat input to analyze your workspace and generate a .github/copilot-instructions.md tailored to your project. VS Code discovers existing AI conventions, analyzes your project structure and generates comprehensive instructions.
Generate a targeted instructions file: Type /create-instruction and describe the convention you want to enforce (e.g. “always use tabs and single quotes in this project”). The agent asks clarifying questions and generates an .instructions.md file with the appropriate applyTo pattern.
Extract instructions from conversation: Ask “extract an instruction from this” mid-conversation to capture a correction as a project convention.
The official recommended prompt for /init from the GitHub Docs is:
Your task is to "onboard" this repository to a coding agent by adding a
.github/copilot-instructions.md file. It should contain information describing
how the agent, seeing the repo for the first time, can work most efficiently.

## Goals
- Document existing project structure and tech stack.
- Ensure established practices are followed.
- Minimize bash command and build failures.

## Limitations
- Instructions must be no longer than 2 pages.
- Instructions should be broadly applicable to the entire project.

## Guidance
Ensure you include the following:
- A summary of what the app does.
- The tech stack in use
- Coding guidelines
- Project structure
- Existing tools and resources

## Steps to follow
- Perform a comprehensive inventory of the codebase. Search for and view:
  - README.md, CONTRIBUTING.md and all other documentation files.
  - Search the codebase for indications of workarounds like 'HACK', 'TODO', etc.
- All scripts, particularly those pertaining to build and repo or environment setup.
- All project files.
- All configuration and linting files.

## Validation
Use the newly created instructions file to implement a sample feature. Use
learnings from any failures or errors to further refine the instructions file.
Complete Frontmatter Field Reference
Every customization file type uses YAML frontmatter. Here is the full verified reference for all fields across all file types, sourced from the official VS Code docs, GitHub Docs and the Agent Skills spec.
.instructions.md — Instruction Files
| Field | Required | Description |
|---|---|---|
name | No | Display name shown in the UI. Defaults to the filename. |
description | No | Short description shown on hover in the Chat view. |
applyTo | No | Glob pattern (comma-separated for multiple) for automatic application relative to workspace root. Use ** to apply to all files. If omitted, the file is not applied automatically but can be manually attached. |
Claude format note: When using
.instructions.mdfiles in the.claude/rules/directory (Claude Code compatibility), usepathsinstead ofapplyTo.pathsaccepts an array of glob patterns and defaults to**when omitted.
Full example:
---
name: "TypeScript Standards"
description: "Coding conventions for TypeScript and React files"
applyTo: "**/*.{ts,tsx}"
---
.prompt.md — Prompt Files
| Field | Required | Description |
|---|---|---|
description | No | Short description shown in the IDE picker. |
name | No | The slash command name used after / in chat. Defaults to the filename without .prompt.md. |
argument-hint | No | Hint text shown in the chat input field to guide users on how to interact with the prompt (e.g. component-name). |
agent | No | The agent used for running the prompt: ask (default chat), agent (full agent mode), plan, or the name of a custom agent. Defaults to the current agent; defaults to agent if tools are specified. |
model | No | The language model to use (e.g. GPT-4o, Claude Sonnet 4.5 (copilot)). Defaults to the model currently selected in the model picker. |
tools | No | Array of tool names available for this prompt. Can include built-in tools, tool sets, MCP tools, or extension-contributed tools. To include all tools from an MCP server, use <server-name>>/* format. If a listed tool is unavailable, it is ignored. |
argument-hintnote: This field is officially documented for prompt files and is used across the Copilot CLI, Claude Code and VS Code. It provides hint text in the chat input showing the expected argument format. It is not the same as${input:varName}variable substitution — it’s purely a UI label.
Full example:
---
name: create-component
description: "Generate a new React form component"
argument-hint: component-name
agent: agent
model: GPT-4o
tools: ["search/codebase", "vscode/askQuestion", "edit"]
---
.agent.md — Custom Agents (VS Code)
| Field | Required | Description |
|---|---|---|
name | No | Display name in the UI. Defaults to the filename. |
description | Yes | Short description of the agent’s role, shown in dropdowns. |
tools | No | Array of tools the agent may use. If omitted, all tools are available. Unavailable tools are ignored. |
model | No | Preferred model or array of models tried in order (e.g. ['Claude Opus 4.5', 'GPT-5.2']). |
handoffs | No | Array of agent transition definitions (see below). VS Code / IDE only — ignored by GitHub.com cloud agent. |
handoffs sub-fields:
| Sub-field | Required | Description |
|---|---|---|
label | Yes | Button label shown in the Chat view. |
agent | Yes | Target agent name or agent for the default coding agent. |
prompt | No | Pre-filled prompt text sent to the target agent. |
send | No | true to auto-submit the prompt; false (default) to pre-fill it for user review. |
argument-hinton agents: The field exists in the shared agent/command format used across Copilot CLI and Claude Code plugins, but it is not a documented VS Code custom agent field and is noted as unsupported in Copilot cloud agents on GitHub.com.
Full example:
---
name: Planner
description: Generate an implementation plan for new features or refactoring existing code.
tools: ["web/fetch", "search/codebase", "search/usages"]
model: ["Claude Opus 4.5", "GPT-5.2"]
handoffs:
  - label: Implement Plan
    agent: agent
    prompt: Implement the plan outlined above.
    send: false
---
.agent.md — Custom Agents (GitHub.com Cloud Agent)
The GitHub Docs define a separate set of fields for .agent.md files used on GitHub.com (at github.com/copilot/agents). These differ from VS Code in two key ways: mcp-servers is supported and argument-hint/handoffs are not.
| Field | Required | Description |
|---|---|---|
name | Yes | Agent name, used for deduplication across levels. |
description | Yes | Short description shown in the GitHub UI. |
tools | No | Array of tool names the agent may use. If omitted, all available tools are enabled. |
mcp-servers | No | YAML block defining MCP servers for the agent (cloud agent only). Supports env var/secret substitution using ${{ secrets.NAME }} and ${{ vars.NAME }} syntax. |
argument-hintandhandoffsare explicitly NOT supported for the GitHub.com cloud agent. Per the GitHub Docs: “Theargument-hintandhandoffsproperties from VS Code and other IDE custom agents are currently not supported for Copilot cloud agent on GitHub.com. They are ignored to ensure compatibility.”
Body length limit: The agent system prompt body can be a maximum of 30,000 characters for the GitHub.com cloud agent.
Full example (cloud agent with MCP):
---
name: my-custom-agent-with-mcp
description: Custom agent with an MCP server configured
tools: ["tool-a", "tool-b", "custom-mcp/tool-1"]
mcp-servers:
  custom-mcp:
    type: "local"
    command: "some-command"
    args: ["--arg1", "--arg2"]
    tools: ["*"]
    env:
      ENV_VAR_NAME: ${{ secrets.COPILOT_MCP_ENV_VAR_VALUE }}
---
SKILL.md — Agent Skills
| Field | Required | Description |
|---|---|---|
name | Yes | The skill name. Must match the parent directory name exactly (e.g. if the directory is skills/my-skill/, name must be my-skill). Skills with a mismatched name are not loaded. |
description | Yes | Describes what the skill does and when to use it. This is what Copilot reads at startup to decide when to activate the skill — write it as trigger guidance. |
user-invocable | No | Controls whether the skill appears in the / slash command menu. Default: true. |
disable-model-invocation | No | When true, prevents Copilot from automatically invoking the skill based on intent matching. Users can still trigger it manually via /skill-name. Default: false. |
Progressive disclosure: At startup, only
nameanddescriptionare loaded (level 1). When relevant, the full SKILL.md body is loaded (level 2). Additional files in the skill directory are only loaded if referenced in the body (level 3). This keeps context usage efficient regardless of how many skills are installed.
Open standard: Skills work across GitHub Copilot in VS Code, GitHub Copilot CLI, the Copilot coding agent and Claude Code.
Full example:
---
name: webapp-testing
description: Guide for testing web applications using Playwright. Use this when asked to create or run browser-based tests.
user-invocable: true
disable-model-invocation: false
---
Field Cross-Reference: Which fields work where
| Field | .instructions.md | .prompt.md | .agent.md (VS Code) | .agent.md (GitHub.com) | SKILL.md |
|---|---|---|---|---|---|
name | ✅ | ✅ | ✅ | ✅ | ✅ (required, must match dir) |
description | ✅ | ✅ | ✅ | ✅ | ✅ (required) |
applyTo | ✅ | — | — | — | — |
agent | — | ✅ | — | — | — |
model | — | ✅ | ✅ | — | — |
tools | — | ✅ | ✅ | ✅ | — |
argument-hint | — | ✅ | ⚠️ CLI/Claude only | ❌ ignored | — |
handoffs | — | — | ✅ | ❌ ignored | — |
mcp-servers | — | — | — | ✅ | — |
user-invocable | — | — | — | — | ✅ |
disable-model-invocation | — | — | — | — | ✅ |
⚠️ = defined in the broader cross-agent spec but not a first-class VS Code IDE field
Input variable syntax (prompt files and instructions body)
Two syntaxes exist for accepting user input:
1. ${input:varName} / ${input:varName:placeholder} syntax
Used in the body of .prompt.md files (and supported in instruction bodies). When the prompt is invoked, Copilot pauses and asks for each variable.
Explain ${input:code:Paste your code here} to a ${input:audience:beginner or expert}.
2. vscode/askQuestion tool
An alternative approach: add vscode/askQuestion to the tools array in frontmatter, then reference #tool:vscode/askQuestion in the body to ask the user for input interactively during execution.
tools: ["vscode/askQuestion", "edit"]
Use #tool:vscode/askQuestion to ask for the component name and fields if not provided.
Community Examples - 19 Library Examples
Custom Instructions (9 examples)
1. Your First Custom Instructions
Complexity: Simple
A minimal introduction demonstrating the impact instructions have on code generation.
When writing functions, always:

- Add descriptive JSDoc comments
- Include input validation
- Use early returns for error conditions
- Add meaningful variable names
- Include at least one example usage in comments
How to test: Add as personal instructions on GitHub.com (profile picture → Personal instructions), then ask: Create a JavaScript function that calculates the area of a circle. Without instructions you get a bare function. With them, Copilot adds JSDoc, input validation, early returns and an example usage comment.
2. Concept Explainer
Complexity: Simple
Instructs Copilot to explain technical concepts progressively — starting from analogies, building toward technical detail and always connecting theory to real problems.
When explaining technical concepts:

## Start Simple, Build Up

- Begin with everyday analogies and familiar examples
- Introduce technical terms gradually after concepts are clear
- Build each new idea on what was already explained
- Use concrete examples before abstract theory

## Make It Practical

- Include working code examples that demonstrate the concept
- Show real-world applications and use cases
- Connect theory to problems developers actually face
- Provide step-by-step implementation when relevant

## Address Common Confusion

- Highlight misconceptions that typically trip up learners
- Explain what NOT to do and why
- Address edge cases that often cause problems
- Show debugging approaches when things go wrong

## Check Understanding

- Ask questions to gauge comprehension
- Provide simple exercises to reinforce learning
- Break complex topics into smaller, digestible pieces
- Adjust complexity based on the learner's responses

Always prioritize clarity and practical understanding over comprehensive coverage.
3. Debugging Tutor
Complexity: Simple
Tells Copilot to act as a debugging teacher — guiding users through systematic methodology rather than handing them direct answers. Builds long-term problem-solving skills.
When helping with debugging, guide users through:

## Systematic Approach

- Start by reproducing the issue consistently
- Read error messages carefully—they contain crucial clues
- Use print statements or debugger to trace execution flow
- Test one change at a time to isolate what fixes the problem

## Key Debugging Questions

- What exactly is happening vs. what you expected?
- When did this problem start occurring?
- What was the last change made before the issue appeared?
- Can you create a minimal example that reproduces the problem?

## Common Investigation Steps

1. Check logs and error messages for specific details
2. Verify inputs and outputs at each step
3. Use debugging tools (breakpoints, step-through)
4. Search for similar issues in documentation and forums

## Teaching Approach

- Ask leading questions rather than giving direct answers
- Encourage hypothesis formation: "What do you think might cause this?"
- Guide toward systematic elimination of possibilities
- Help build understanding of the underlying problem, not just quick fixes
- Focus on teaching debugging methodology that users can apply independently to future problems
- Encourage defensive programming techniques to prevent common error categories
- Teach how to build automated tests that catch regressions and edge cases

## Teaching Through Debugging

- Use debugging sessions as opportunities to reinforce programming concepts
- Explain the reasoning behind each debugging step and decision
- Help learners understand code execution flow and data transformations
- Connect debugging exercises to broader software engineering principles
- Build pattern recognition skills for common problem categories

Always encourage curiosity and questioning rather than providing quick fixes, building long-term debugging skills and confidence.
4. Code Reviewer
Complexity: Simple
Directs Copilot to focus code reviews on security, performance and code quality — with constructive, reasoned feedback.
When reviewing code, focus on:

## Security Critical Issues

- Check for hardcoded secrets, API keys, or credentials
- Look for SQL injection and XSS vulnerabilities
- Verify proper input validation and sanitization
- Review authentication and authorization logic

## Performance Red Flags

- Identify N+1 database query problems
- Spot inefficient loops and algorithmic issues
- Check for memory leaks and resource cleanup
- Review caching opportunities for expensive operations

## Code Quality Essentials

- Functions should be focused and appropriately sized
- Use clear, descriptive naming conventions
- Ensure proper error handling throughout

## Review Style

- Be specific and actionable in feedback
- Explain the "why" behind recommendations
- Acknowledge good patterns when you see them
- Ask clarifying questions when code intent is unclear

Always prioritize security vulnerabilities and performance issues that could impact users.
5. GitHub Actions Helper
Complexity: Simple | Path-specific: .github/workflows/**/*.yml
A path-specific file that activates only when Copilot works with GitHub Actions workflow YAML files. Enforces security (secret handling, SHA-pinning), performance (caching, timeouts) and best-practice patterns.
---
applyTo: ".github/workflows/**/*.yml"
---

When generating or improving GitHub Actions workflows:

## Security First

- Use GitHub secrets for sensitive data, never hardcode credentials
- Pin third-party actions to specific commits by using the SHA value
  (e.g., `- uses: owner/some-action@a824008085750b8e136effc585c3cd6082bd575f`)
- Configure minimal permissions for GITHUB_TOKEN required for the workflow

## Performance Essentials

- Cache dependencies with `actions/cache` or built-in cache options
- Add `timeout-minutes` to prevent hung workflows
- Use matrix strategies for multi-environment testing

## Best Practices

- Use descriptive names for workflows, jobs and steps
- Include appropriate triggers: `push`, `pull_request`, `workflow_dispatch`
- Add `if: always()` for cleanup steps that must run regardless of failure
6. Pull Request Assistant
Complexity: Simple
A comprehensive instructions set for both writing PR descriptions and reviewing PRs.
7. Issue Manager
Complexity: Simple
Instructions for writing well-structured GitHub issues — for bugs, feature requests and issue responses — with clear titles, reproduction steps, acceptance criteria and consistent triage templates.
8. Accessibility Auditor
Complexity: Intermediate | Path-specific: **/*.html
A path-specific instructions file for HTML files. Directs Copilot to evaluate code for WCAG accessibility compliance — checking ARIA attributes, keyboard navigation, color contrast, semantic HTML, screen reader compatibility — and to generate actionable remediation suggestions.
9. Testing Automation
Complexity: Advanced | Path-specific: tests/**/*.py
The most advanced custom instructions example in the library. Path-specific for Python test files. Embeds a concrete pytest code pattern directly in the instructions to teach Copilot the exact conventions to follow.
---
applyTo: "tests/**/*.py"
---

When writing Python tests:

## Test Structure Essentials

- Use pytest as the primary testing framework
- Follow AAA pattern: Arrange, Act, Assert
- Write descriptive test names that explain the behavior being tested
- Keep tests focused on one specific behavior

## Key Testing Practices

- Use pytest fixtures for setup and teardown
- Mock external dependencies (databases, APIs, file operations)
- Use parameterized tests for testing multiple similar scenarios
- Test edge cases and error conditions, not just happy paths

## Example Test Pattern

import pytest
from unittest.mock import Mock, patch

class TestUserService:
@pytest.fixture
def user_service(self):
return UserService()

    @pytest.mark.parametrize("invalid_email", ["", "invalid", "@test.com"])
    def test_should_reject_invalid_emails(self, user_service, invalid_email):
        with pytest.raises(ValueError, match="Invalid email"):
            user_service.create_user({"email": invalid_email})

    @patch('src.user_service.email_validator')
    def test_should_handle_validation_failure(self, mock_validator, user_service):
        mock_validator.validate.side_effect = ConnectionError()

        with pytest.raises(ConnectionError):
            user_service.create_user({"email": "test@example.com"})
Prompt Files (6 examples)
All stored in .github/prompts/*.prompt.md. Available in VS Code, Visual Studio and JetBrains only.
10. Your First Prompt File
Complexity: Simple | Filename: explain-code.prompt.md
---
agent: "agent"
description: "Generate a clear code explanation with examples"
---

Explain the following code in a clear, beginner-friendly way:

Code to explain: ${input:code:Paste your code here}
Target audience: ${input:audience:Who is this explanation for? (e.g., beginners, intermediate developers, etc.)}

Please provide:

- A brief overview of what the code does
- A step-by-step breakdown of the main parts
- Explanation of any key concepts or terminology
- A simple example showing how it works
- Common use cases or when you might use this approach

Use clear, simple language and avoid unnecessary jargon.
How to test: Save the file, open Copilot Chat in VS Code, type /explain-code. Copilot switches to agent mode and prompts you for the code and audience variables.
Key concepts demonstrated: ${input:variableName:placeholder} syntax, agent: 'agent' frontmatter, the description field.
11. Create README
Complexity: Simple | Filename: create-readme.prompt.md
Reusable across repositories. Copilot scans the codebase and generates a structured README covering: project description, prerequisites, installation, usage examples, contributing guide and license section.
12. Onboarding Plan
Complexity: Simple | Filename: onboarding-plan.prompt.md
Generates a personalized onboarding plan for a new team member joining a project.
13. Document API
Complexity: Advanced | Filename: document-api.prompt.md
Generates comprehensive API documentation from source code. Covers endpoint descriptions, request/response schemas, authentication requirements, error codes and usage examples.
14. Review Code
Complexity: Advanced | Filename: review-code.prompt.md
Performs a structured code review with actionable feedback. Analyzes for correctness, performance, security vulnerabilities, readability, test coverage gaps and adherence to conventions.
15. Generate Unit Tests
Complexity: Intermediate | Filename: generate-unit-tests.prompt.md
Takes source code as input and generates unit tests covering happy paths, edge cases, boundary conditions and error scenarios.
Custom Agents (4 examples)
All stored in .github/agents/*.agent.md. Must be on the default branch. Used at github.com/copilot/agents.
16. Your First Custom Agent — README Specialist
Complexity: Simple | Filename: readme-specialist.agent.md
---
name: readme-specialist
description: Specialized agent for creating and improving README files and project documentation
tools: ["read", "search", "edit"]
---

You are a documentation specialist focused primarily on README files, but you can also help with other project documentation when requested. Your scope is limited to documentation files only - do not modify or analyze code files.

**Primary Focus - README Files:**

- Create and update README.md files with clear project descriptions
- Structure README sections logically: overview, installation, usage, contributing
- Write scannable content with proper headings and formatting
- Add appropriate badges, links and navigation elements
- Use relative links (e.g., `docs/CONTRIBUTING.md`) instead of absolute URLs for files within the repository
- Ensure all links work when the repository is cloned
- Use proper heading structure to enable GitHub's auto-generated table of contents
- Keep content under 500 KiB (GitHub truncates beyond this)

**Important Limitations:**

- Do NOT modify code files or code documentation within source files
- Do NOT analyze or change API documentation generated from code
- Focus only on standalone documentation files
- Ask for clarification if a task involves code modifications

Always prioritize clarity and usefulness. Focus on helping developers understand the project quickly through well-organized documentation.
17. Implementation Planner
Complexity: Simple | Filename: implementation-planner.agent.md
Breaks down a feature request or user story into actionable implementation tasks and creates a detailed plan. The agent focuses on planning only — it does not write code.
18. Bug Fix Teammate
Complexity: Simple | Filename: bug-fix-teammate.agent.md
Identifies critical bugs in the project and implements targeted, minimal fixes.
19. Cleanup Specialist
Complexity: Simple | Filename: cleanup-specialist.agent.md
Cleans up messy code across both code and documentation files without changing any external behavior.
Beyond these 19 official examples, GitHub maintains a community repository with additional material:
- Awesome GitHub Copilot Customizations: https://github.com/github/awesome-copilot
- Instructions by language/scenario:
docs/README.instructions.md - Prompt files:
docs/README.prompts.md - Custom agents:
agents/directory
- Instructions by language/scenario:
Best Practices & Design Patterns
Sources:
- https://docs.github.com/en/copilot/tutorials/use-custom-instructions (official GitHub Docs tutorial)
- https://github.blog/ai-and-ml/github-copilot/5-tips-for-writing-better-custom-instructions-for-copilot/ (official GitHub Blog, September 2025)
- https://awesome-copilot.github.com/learning-hub/defining-custom-instructions/ (GitHub’s own Awesome Copilot community hub)
- https://code.visualstudio.com/docs/copilot/customization/custom-instructions (VS Code official docs, March 2026)
Writing Effective Custom Instructions
1. Keep files short and focused
The most important rule from the official docs: shorter instruction files are more reliably processed.
- Copilot code review only reads the first 4,000 characters of any instruction file. Instructions beyond that limit are ignored entirely for code review purposes. (This limit does not apply to Copilot Chat or the coding agent.)
- For general quality, keep any single instruction file to a maximum of around 1,000 lines. Beyond this, response quality can deteriorate.
- Start with a minimal set of 10–20 specific instructions, then add more iteratively based on what actually works.
2. Use clear structure and formatting
Copilot processes well-structured Markdown better than narrative prose. Use:
- Distinct headings (
##) to separate topics - Bullet points for rules — easier to scan than paragraphs
- Short, imperative directives (“Use snake_case for variables”) rather than long explanations
Don’t write this:
When you're reviewing code, it would be good if you could try to look for
situations where developers might have accidentally left in sensitive
information like passwords or API keys and also check for security issues.
Write this instead:
## Security

- Check for hardcoded secrets, API keys, or credentials
- Look for SQL injection and XSS vulnerabilities
- Verify proper input validation and sanitization
3. Include the reasoning behind rules
When instructions explain why a convention exists, the AI makes better decisions in edge cases. For example: “Use date-fns instead of moment.js because moment.js is deprecated and increases bundle size.”
4. Provide concrete code examples
Examples eliminate ambiguity. Include code snippets showing both the pattern to avoid and the pattern to prefer.
## Naming

Use intention-revealing names.

```javascript
// Avoid
const d = new Date();
const x = users.filter((u) => u.active);

// Prefer
const currentDate = new Date();
const activeUsers = users.filter((user) => user.isActive);
```
### 5. Be specific, not vague

Vague instructions do not help. The official docs specifically call these out as **not supported** for code review:

- ❌ `Be more accurate`
- ❌ `Don't miss any issues`
- ❌ `Be consistent in your feedback`

Instead, write instructions about specific patterns in your codebase.

### 6. Focus on non-obvious rules

Skip conventions that standard linters or formatters already enforce. Only document what's unique to your team or project.

### 7. Avoid instructions Copilot cannot follow

From the official docs, the following types of instructions are **not currently supported** for Copilot code review:

- Instructions that change formatting: `Use bold text for critical issues`, `Add emoji to comments`
- Instructions that modify the PR overview comment: `Include a summary of security issues in the PR overview`
- Instructions that change core function: `Block a PR from merging unless all Copilot comments are addressed`
- Instructions referencing external URLs: `Review code according to standards at https://example.com`
  - Workaround: Copy the relevant content directly into your instruction file
- Instructions about self-improvement: `Be consistent`, `Don't miss any issues`

### 8. Don't let perfect be the enemy of good

An "imperfect" instructions file delivers far more impact than no file at all. Instruction files should evolve over time, just like documentation. Experiment, iterate and don't overthink the initial version.

---

## Structuring the Content of `copilot-instructions.md`

The official GitHub Blog recommends five sections every instructions file should include:

### Section 1: Project overview

The header of your instructions file should be the elevator pitch for your project.

```markdown
# Contoso Companions

This is a website to support pet adoption agencies. Agencies can manage their
locations, available pets and publicize events. Potential adopters can search
for pets in their area and submit adoption applications.
Section 2: Tech stack
List the technologies in use — backend, frontend, testing. This prevents Copilot from generating code for the wrong framework.
## Tech Stack

### Backend

- Flask for the API
- PostgreSQL with SQLAlchemy as the ORM

### Frontend

- Astro for core site and routing
- Svelte for interactivity
- TypeScript for all frontend code

### Testing

- pytest for Python unit tests
- Vitest for TypeScript
- Playwright for end-to-end tests
Section 3: Coding guidelines
Explicit rules about how code should be written — naming conventions, formatting, patterns to use or avoid.
## Coding Guidelines

- Always use type hints in any language that supports them
- JavaScript/TypeScript must use semicolons
- Unit tests are required and must pass before a PR can merge
- Follow RESTful API design principles
- Always follow good security practices
- Use scripts to perform actions when available
Section 4: Project structure
List what’s in each directory. This saves Copilot exploration time.
## Project Structure

- server/ : Flask backend
  - models/ : SQLAlchemy ORM models
  - routes/ : API endpoints organized by resource
  - tests/ : Unit tests
- client/ : Astro/Svelte frontend
  - src/components/ : Reusable Svelte components
  - src/pages/ : Astro pages and routes
- scripts/ : Development, deployment and testing scripts
- docs/ : Project documentation — kept in sync at all times
Section 5: Available resources and tools
Point Copilot to scripts, MCP servers and other tools it can use.
## Resources

- scripts/start-app.sh : Installs all libraries and starts the app
- scripts/test-project.sh : Runs unit and end-to-end tests
- MCP servers:
  - Playwright: For generating tests or interacting with the site
  - GitHub: For interacting with the repository and backlog
Organizing Instructions Across Multiple Files
Pattern: Repository-wide + path-specific split
Use copilot-instructions.md for concerns that apply to the entire codebase and path-specific *.instructions.md files for language- or directory-specific rules.
Recommended layout:
.github/
  copilot-instructions.md           ← General: security, error handling, docs

.github/instructions/
  python.instructions.md            ← Python-only (applyTo: "**/*.py")
  typescript.instructions.md        ← TypeScript-only (applyTo: "**/*.{ts,tsx}")
  frontend.instructions.md          ← React components (applyTo: "src/components/**/*.{tsx,jsx}")
  api.instructions.md               ← API routes (applyTo: "src/routes/**")
Use copilot-instructions.md for:
- General team standards
- Universal security requirements
- Cross-cutting concerns (error handling, logging philosophy)
- Documentation expectations
Use path-specific files for:
- Language-specific naming conventions and style
- Framework-specific patterns (React, Flask, etc.)
- Technology-specific security concerns
- Different rules for different parts of the codebase
Recommended file structure template
---
applyTo: "**/*.{js,ts}" # Only needed for path-specific files
---

# [Technology or Domain] Guidelines

## Purpose

Brief statement of what this file covers and when these instructions apply.

## Naming Conventions

- Rule 1
- Rule 2

## Code Style

- Style rule 1

## Error Handling

- How to handle errors
- What to avoid

## Security Considerations

- Security rule 1

## Testing Guidelines

- Testing expectation 1
Testing and Iterating on Instructions
Start minimal, iterate
- Begin with 10–20 instructions covering your most important standards
- Open a pull request and request a Copilot review
- Observe which instructions Copilot follows reliably and which it misses
- Add one new instruction at a time, test with a real PR, then refine
Signs an instruction is not working
- It’s vague or ambiguous — rewrite it to be specific and imperative
- The file is too long — the instruction may be past the 4,000-character limit
- Instructions conflict with each other — review and prioritize
Avoiding common anti-patterns
| Anti-pattern | Problem | Fix |
|---|---|---|
applyTo: '**' for language-specific rules | Rules bleed into unrelated files | Scope to the relevant extension: applyTo: '**/*.py' |
| Instructions referencing deprecated libraries | Copilot generates outdated code | Review and update instructions when dependencies change |
| 2,000-line instruction file | Instructions past the 4,000-character limit are ignored by code review | Break into multiple focused files |
| Conflicting instructions across files | Non-deterministic behavior | Design complementary instructions; more specific patterns take priority |
Custom Agent Design Patterns
Always define explicit scope limits
Every agent profile in the official library includes a clear “do NOT” section. Without explicit scope limits, agents can drift into unintended areas of the codebase.
**Important Limitations:**

- Do NOT modify code files or code documentation within source files
- Do NOT analyze or change API documentation generated from code
- Focus only on standalone documentation files
- Ask for clarification if a task involves code modifications
Define escalation behavior
Agents should know what to do when they encounter something outside their scope rather than proceeding silently.
Keep the tools array minimal
Only declare the tools the agent actually needs. An agent that only needs to read and search should not include edit.
Use model preferences and handoffs for multi-agent workflows
Use the model field to specify preferred models in priority order. Use handoffs to create guided workflows between agents — for example, transitioning from a planning agent directly into an implementation agent with pre-filled context.
handoffs:
  - label: Implement Plan
    agent: implementation
    prompt: Now implement the plan outlined above.
    send: false # pre-fills the prompt for user review
Separate planning agents from implementation agents
Having separate agents for planning and implementation makes each one more predictable and easier to review. The library’s Implementation Planner demonstrates this: an agent that only reads the codebase and produces a plan, but never writes code.
Key Hard Limits (from the Docs)
These are confirmed technical constraints, not style recommendations:
- 4,000 characters: The maximum Copilot code review reads from any instruction file. Instructions beyond this are silently ignored for PR reviews. (Does not apply to Copilot Chat or the coding agent.)
- ~1,000 lines: Recommended soft limit for any instruction file before quality starts degrading.
- No external URL following: Copilot cannot fetch external links in instructions. Copy relevant content directly into the file.
- Both files applied when overlap occurs: When a path-specific
.instructions.mdfile andcopilot-instructions.mdboth match the same file, both sets of instructions are used. Avoid writing contradictory instructions across them. - Base branch used for PR reviews: Copilot code review uses the instructions from the base branch of the PR (e.g.
main), not the feature branch. New instruction files must be merged before they affect reviews. - Inline suggestions unaffected: Custom instructions do not apply to inline code suggestions (autocomplete). They apply to Copilot Chat interactions only.